系统学习前端Vue框架,笔记记录于B站的why老师,具体视频链接如下,在此感谢老师的悉心授课
初始化Vue
初始Vue
1 | <script src="../js/vue.js"></script> |
简易计数器
1 | <body> |
Vue中的MVVM
MVVM简介
MVVM 是Model-View-ViewModel 的缩写,它是一种基于前端开发的架构模式,其核心是提供对View 和 ViewModel 的双向数据绑定,这使得ViewModel 的状态改变可以自动传递给 View,即所谓的数据双向绑定。
Vue.js 是一个提供了 MVVM 风格的双向数据绑定的 Javascript 库,专注于View 层。它的核心是 MVVM 中的 VM,也就是 ViewModel。 ViewModel负责连接 View 和 Model,保证视图和数据的一致性,这种轻量级的架构让前端开发更加高效、便捷。
MVVM模型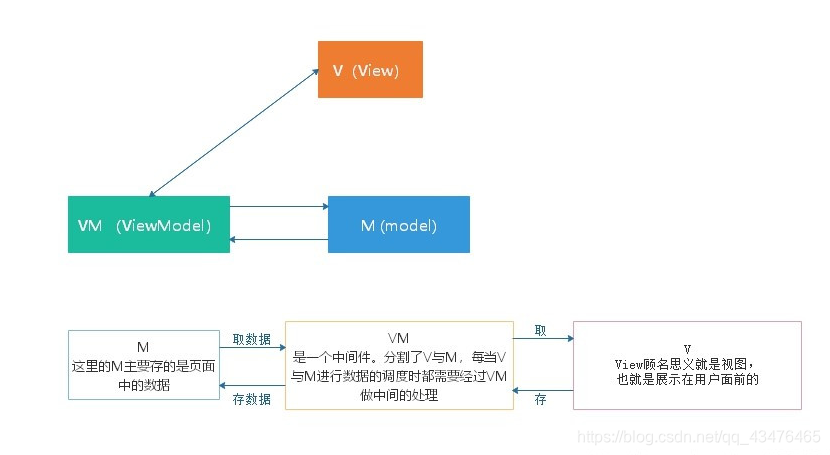
MVVM拆开来即为Model-View-ViewModel,有View,ViewModel,Model三部分组成。
- View层:是视图、模版,负责将数据模型转化为UI展现出来。
- Model层:是模型、数据,可以在Model层中定义数据修改和操作的业务逻辑。
- ViewModel层:View层和Model层并没有直接联系,而是通过ViewModel层进行交互。ViewModel层通过双向数据绑定将View层和Model层连接了起来,使得View层和Model层的同步工作完全是自动的。
Vue.js中mvvm的体现
Vue.js的实现方式,对数据(Model)进行劫持,当数据变动时,数据会出发劫持时绑定的方法,对视图进行更新。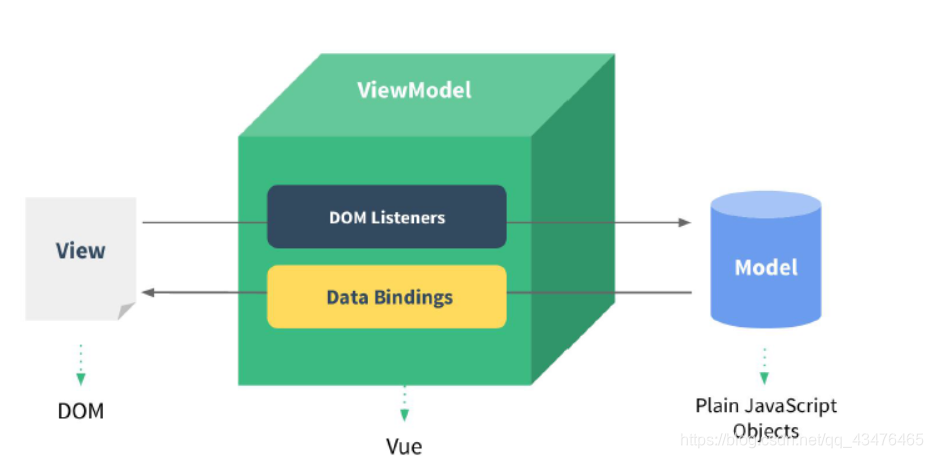
实例分析如下: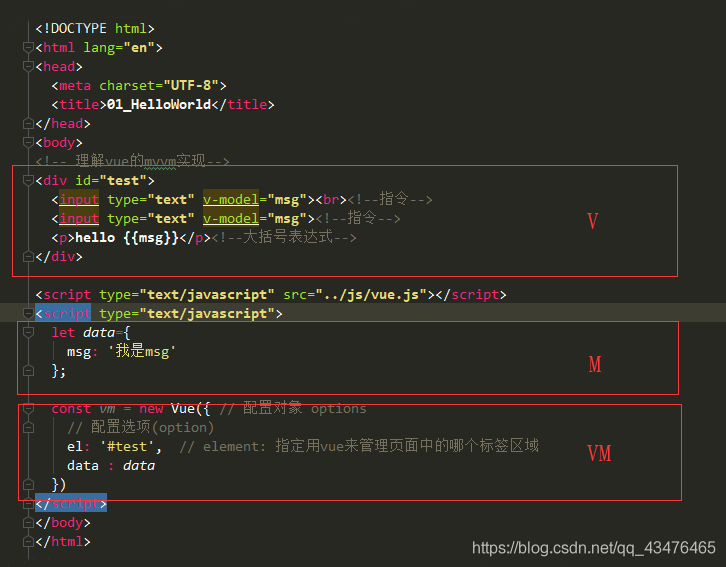
Vue.js关于双向数据绑定的一些实现细节
vue是采用Object.defineProperty的getter和setter,并结合观察者模式来实现数据绑定的。当把一个普通的javascript对象传给Vue实例来作为它的data选项时,Vue将遍历它的属性,用Object.defineProperty将它们转为getter/setter。用户看不到getter/setter,但是在内部它们让Vue追踪依赖。在属性被访问和修改时通知变化。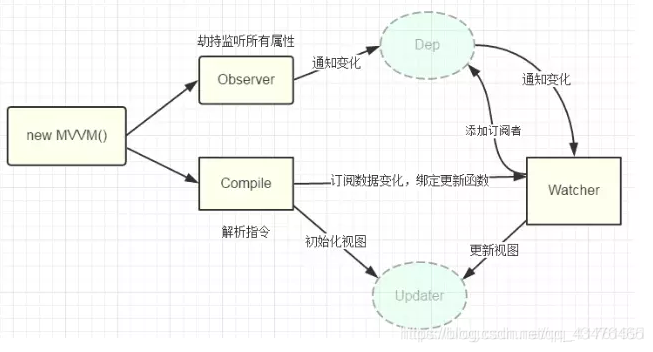
- Observer相当于Model层观察vue实例中的data数据,当数据发生变化时,通知Watcher订阅者。
- Compile指令解析器位于View层,初始化View的视图,将数据变化与更新函数绑定,传给Watcher订阅者。
- Watcher是整个模型的核心,对应ViewModel层,连接Observer和Compile。所有的Watchers存于Dep订阅器中,Watcher将Observer监听到的数据变化对应相应的回调函数,处理数据,反馈给View层更新界面视图。
- Dep消息订阅器,内部维护了一个数组,用来收集订阅者(watcher),数据变动触发notify函数,再调用订阅者的update方法。
基本模板语法
1 |
|
动态绑定属性
class的绑定
传给 v-bind:class 一个对象,以动态地切换 class(语法糖:’:表示’)
根据isActive的true,false变化,动态绑定单个class
1 | <div :class="{ active: isActive==true }"></div> |
计算属性的方式绑定class
1 | <div :class="classObject"></div> |
数组的方式绑定class
1 | <div v-bind:class="[activeClass, errorClass]"></div> |
三元表达式动态切换class(推荐)
1 | <div :class="[isActive ? activeClass : '', errorClass]"></div> |
style的绑定
v-bind:style 的对象语法十分直观——看着非常像 CSS,但其实是一个 JavaScript 对象。CSS 属性名可以用驼峰式 (camelCase) 或短横线分隔 (kebab-case,记得用单引号括起来) 来命名:
1 | <div v-bind:style="{ color: activeColor, fontSize: fontSize + 'px' }"></div> |
直接绑定到一个样式对象通常更好,这会让模板更清晰:
1 | <div :style="styleObject"></div> |
v-bind:style 的数组语法可以将多个样式对象应用到同一个元素上:
1 | <div v-bind:style="[baseStyles, overridingStyles]"></div> |
计算属性
1 | <body> |
计算属性和methods的对比
1 | <body> |
事件监听
v-on的基本使用
1 | <body> |
v-on的参数问题
1 | <body> |
v-on的修饰符
1 | <body> |
条件判断
v-if的基本使用
1 | <body> |
v-if和v-else的使用
1 | <body> |
v-if和v-else-if和v-else的使用
1 | <body> |
用户登录切换的案例
1 | <body> |
用户登录切换的案例(复用的小问题)
1 | <body> |
v-show的使用
1 | <body> |
循环遍历
v-for遍历数组
1 | <body> |
v-for遍历对象
1 | <body> |
v-for使用过程添加key
1 | <body> |
那些数组的方法是响应式的
1 | <body> |
对遍历出的列表,点击后对应的能变红
1 | <body> |
书籍购物车案例
此案例包含JavaScript的高阶函数用法
1 | // javascript的高阶函数: |
index.html
1 |
|
main.js
1 | const app = new Vue({ |
style.css
1 | table { |
v-model的使用
v-model双向绑定的基本原理
1 | <body> |
v-model结合radio单选框使用
1 | <body> |
v-model结合checkbox多选框使用
1 | <body> |
v-model结合select下拉框使用
1 | <body> |
v-model结合v-for使用
1 | <body> |
v-model的修饰符使用
1 | <body> |
组件化开发
组件化的基本使用
1 | <body> |
全局组件和局部组件
1 | <body> |
父组件和子组件
1 | <body> |
组件的语法糖注册方式
1 | <body> |
组件模块的分离写法
1 | <body> |
组件中的数据存放问题
1 | <body> |
组件中的data为什么必须是函数
1 | <body> |
组件通信-父组件向子组件传递数据
1 | <body> |
组件通信-props用法详解
1 | <body> |
组件通信-父传子(props不支持驼峰标识)
1 | <body> |
组件通信-父子组件通信的案例
1 | <body> |
组件通信-数字游戏-1
1 | <body> |
组件通信-数字游戏-2
1 | <body> |
组件通信-父访问子-children-refs
1 | <body> |
组件通信-子访问父-parent-root
1 | <body> |
组件化高级
slot-插槽的基本使用
1 | <body> |
slot-具名插槽的使用
1 | <body> |
什么是编译的作用域
1 | <body> |
作用域插槽的准备
1 | <body> |
前端模块化
ES模块化的实现
aaa.js
1 | var name = '小红' |
bbb.js
1 | var name = '小红' |
index.html
1 |
|
mmm.js
1 | import {flag} from "./aaa.js"; |
webpack使用
webpack的起步
info.js
1 | export const name = 'why' |
main.js
1 | // 1.使用commonjs的模块化规范 |
mathUtils.js
1 | function add(num1, num2) { |
index.html
1 |
|
webpack的配置
webpack.config.js
1 | const path = require('path') |
package.json
1 | { |
webpack配置loader和vue
webpack.config.js
1 | const path = require('path') |
html
index.html
1 |
|
js
main.js
1 | // 1.使用commonjs的模块化规范 |
info.js
1 | export const name = 'why' |
mathUtils.js
1 | function add(num1, num2) { |
css
normal.css
1 | body { |
special.less
1 | @fontSize: 50px; |
模块展示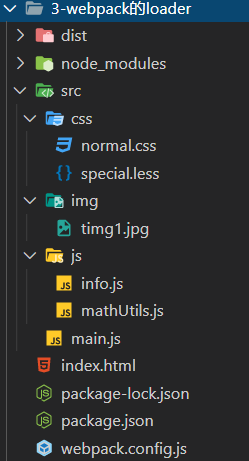
vue-cli3使用
App.vue
1 | <template> |
HelloWorld.vue
1 | <template> |
main.js
1 | import Vue from 'vue' |
vue-router前端路由
vue-tabbar
vuex
axios
request.js
1 | import axios from 'axios' |
main.js
1 | import Vue from 'vue' |


